How To Tie Down A Kayak On A J Rack: Step By Step
March 23, 2022
J Racks are an excellent way to transport your kayak quickly to and from the water. They make it easy and secure, and help truck owners keep that bed open for other gear. They're also one of the most affordable ways to transport your boat. But, it can be daunting if you've just purchased your pair of J-racks and are trying to figure out how to use them.
No need to fear - we're here to help you set off on the right foot. Today, we will teach you how to tie down a kayak on a J rack. As you'll soon discover, it's simple. But trust us - the last thing you want to do is make a mistake and risk damaging or losing your kayak. So, pay close attention throughout.
First things first - what are J Racks?
What Are J Racks?
Kayak J Racks, known as J cradles throughout the kayaking world, are convenient, affordable transportation solutions. They mount to your kayak crossbars on the roof of your vehicle. The name is derived from the shape of these racks—they feature a J appearance.
The beauty of this rack style allows even tiny vehicles to transport large kayaks. However, most people use a kayak roof rack with a pickup truck or SUV. The main reason kayakers prefer this type of rack is the cost. Compared to other style roof racks—which we'll cover in just a few moments—they're affordable. And they are incredibly secure because your kayak is transported sideways rather than upside down. This helps mitigate the risk of a heavy gust of wind grabbing and dislodging your boat.
But of course, all the benefits of J racks only apply if you understand how to tie down a kayak on a J rack correctly. That's the main topic we're here to discuss today. But first - are J racks the right choice for you and your kayak? Let's look at a few scenarios where there may be better approaches to transportation.
Are J Racks Right For Me?
J racks are great for a wide range of kayakers - but sometimes they need to catch up.
One such instance where the J rack system may not be your best bet is if you need help loading the kayak yourself. This is fine if you always have another set of hands to help you load and unload your kayak. As we'll discuss later, many solo kayakers are strong enough to lift their boat onto the J rack, especially with lift assistants.
However, there is no doubt that some kayakers prefer to load from the rear with kayak saddles and a kayak roller to assist in this. Consider an alternative if you have a heavy kayak and need more confidence lifting it yourself.
While J cradles are a great option if your car has crossbars, not all vehicles do, so you'll have to factor the cost of crossbars into your budget. One final scenario where J rack systems may need to be clarified is if your kayak exceeds the weight limit. J racks aren't the strongest in weight capacity - so if you have an extra heavy kayak, you may consider saddles or even a towable kayak trailer.
J Rack Alternatives
As we discussed in our article on how to transport a kayak, there are alternatives to the J rack. This is just one of a few approaches to getting your boat to and from the water. Here are all your options:
- Kayak trailers
- Kayak saddles
- Kayak crossbars
- Kayak stacker racks
To learn more about which styles best suit your needs, read our guide on transporting your kayak - we break it all down for you there. It's worth noting that a canoe roof rack is not a safe substitute for a kayak roof rack, much less a J cradle. For now, though, let's focus on how to load a kayak on a J rack.
How To Tie Down A Kayak On A J Rack: Step By Step
Ready to learn how to tie down a kayak on a J rack? You need to take this seriously to protect your kayak investment. The last thing you want is to damage or lose your kayak while in transit. However, it's simple. In less than ten (10) steps, you can quickly load your kayak on the J rack. Let's start by explaining how to get your J rack on your crossbars.
Step 1) Attach Your J Rack To The Crossbars
We're going to assume you already have crossbars mounted on your vehicle. If so, you can easily attach your J cradle to the crossbar system. J cradles typically have clamps that allow quick and easy mounting onto the crossbars. You may be wondering about compatibility since crossbars vary from round to square. But you don't have to stress about this - most J racks include adapters to fit various crossbar styles.
Furthermore, most J racks come with a lock to secure them. You'll want to get your lock if you still need to. This adds a layer of security regarding transportation and ensures nobody tries to steal your racks. At the same time, your car is parked, and you're paddling on the water. Trust us - you don't want to head back up to the car as the sun's going down only to discover you're the victim of theft. Not only will you need to buy another set, but you cannot get your boat home in the meantime!
Step 2) Put Your Straps On The J Rack To Prepare
Once your J racks are locked onto the crossbars, you're ready to prepare your kayak straps and tie-downs. If you already have cam straps, you don't need to go out and buy unique kayak straps - although these are made specifically for use on these types of racks. So if yours are old and worn, they're worth upgrading.
OK, back to preparing your straps. We see so many kayakers get this wrong. They think the first step to tying down their boat is getting it on the racks. Wrong. You want to line up your straps first! It makes things much easier once you put the kayak on the rack.
In terms of putting your straps on the J rack, loop them up through the upright of your rack. Some J racks even have a little clip to loop your cam strap through to hold it in place while you put your kayak up. This clip sits at the top of the upright. However, many of us feel it is easier to loop the cam strap through the upright and let it fall to the bottom. Experiment with both and see which you prefer - there is no right or wrong answer here.
Then, pull it out of the way. You'll pull the front strap down towards the front tire and the rear strap towards the rear tire. You want them out of the way so they don't get stuck under your kayak once you load it up.
Step 3) Bring Your J Rack To The Proper Angle
If you haven't already, ensure your J rack is angled open to rest your kayak in the "J easily." Nothing is more frustrating than picking up a heavy kayak and preparing to load it only to discover your J rack is closed. You'll then have to put your boat down, open the J rack to the proper angle, and pick the boat up again. Trust us. It's worth checking your J rack angles before lifting the kayak off the ground!
Step 4) Prepare Your Kayak At The Side Of The Car
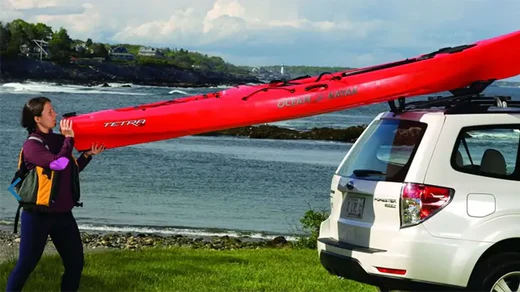
Most kayakers will agree that lifting your boat from the side of your car is the preferred loading approach. However, there may be instances where other options are available, like when you're stuck in a crowded parking lot. In this case, you may have no choice but to get some assistance with rear loading, especially if you have a heavier, longer boat.
For now, though, we'll discuss side-loading. To do this, bring your boat to the side of your car and place it beneath your J racks.
Before loading it, ensure you've emptied the cockpit of anything that could fly away during transport. Once your boat is loaded on the racks, you will need more time to reach in and move things around.
Step 5) Load The Kayak On The J Rack
Now comes the moment you've been waiting —load the kayak on the J rack. Before attempting, consider this carefully: Can you lift the kayak yourself? Many kayakers are strong enough to do so—even with larger, heavier, cumbersome boats. But if you are not, don't attempt to lift the kayak yourself. There is no shame in asking for help.
Trust us—trying to be a hero and lifting too much on your own is a surefire way to hurt yourself, drop and damage your kayak, or damage your car. None of these are worth it—put your ego aside and ask for help if needed!
With that said, go ahead and lift your kayak onto the J rack system.
Step 6) Adjust Your Kayak To Distribute Weight Evenly
Once your kayak is loaded onto the J rack, you can adjust it to the proper position. Before you tie anything down, there are a few things to note: first and foremost, ensure the weight is distributed evenly on both J racks. You don't want the front J rack to take on the weight of the back J rack. The center of your boat should be in the center of the roof rack system.
You should also note whether or not your kayak is "in the pocket." Your boat should be sitting snugly inside the J roof rack. You can confirm this by wriggling the boat around—if there is excessive movement, you need to adjust further. Most of the time, wriggling the boat will help it fall into place. You'll be able to tell if something is not quite right.
Step 7) Tie Down The Kayak On The J Rack
Ready for the fun part? Tying down the kayak on the J racks. If you followed our advice, looped your straps through in step 2, and got them down out of the way, tying down your kayak is the easiest part of this process.
You'll pick up your cam straps, bring them around and behind the boat, and throw them over to the front. Before actually tying down anything, pull the strap tight so that it loops around the top of your J rack frame. You don't want it to loosen up during transit. From there, you can pull the tag end without the cam buckle. This will bring the cam buckle up on the kayak—you want it to rest about halfway up your boat.
Then, stick the tag end through the hole on the bottom of your J rack (right above the crossbars). Pull this tag end through and under your crossbars. Pulling the strap underneath the crossbar before returning it to the cam buckle is essential. This adds a level of strength to your tie-down. You have the strength of the J rack, the crossbars, and the roof rack itself. This failsafe adds a level of security and peace of mind.
Then, after you've looped your strap around the crossbar, please bring it back up through that same slot in your J rack and attach it to your buckle. Be sure the buckle is up high and about halfway on your kayak. This will help ensure that the buckle doesn't hit your car or window and cause damage. Therefore, we recommend using straps with rubber buckles rather than metal buckles. This will also protect your kayak.
Pull the strap and buckle it as tight as possible. Tie off any excess strap dangling on the side of your car so you won't flap around while driving. Then, repeat the tie-down process on the other J rack.
Step 8) Drive Off!
At this point, your kayak is securely loaded and tied on the J cradle. As you can see, it's not so tough! You're ready to hop in the car and head to the water. To get your boat off the kayak racks once you reach your destination, you'll loosen your straps, unloop them, and carefully lift your boat off the shelf.
Final Thoughts On How To Tie Down A Kayak On A J Rack
Now that you know how to die down a kayak on a J rack, you should be confident in setting out for your first adventure with your new roof rack. As you can see, loading a kayak on a J cradle isn't all that difficult - it's as simple as eight (8) easy steps. You can likely do it alone, but if not - always ask for help. Fellow paddlers in the parking lot with you would prefer to come and ask for help rather than see you injure yourself or harm your car/boat.
How do you strap down a kayak on a J rack?
Place the kayak into the J-shaped holders, then use straps to securely tie it to the rack, wrapping them over the kayak's body and under the crossbars of your vehicle's roof rack. Tighten the straps to ensure the kayak is stable and won't move during transport.
What is the best way to tie a kayak on a roof rack?
The best way to tie down a kayak on a roof rack is to center the kayak securely on the rack and use cam straps to tie it down at both the front and back, ensuring the straps go over the kayak's body and are fastened tightly to the rack's crossbars. You may also use bow and stern lines to connect the kayak's front and rear to the vehicle's towing hooks or another secure point.
Do you need to tie down the front and back of the kayak?
Yes, you need to tie down the front and back of the kayak to prevent the kayak from shifting or lifting off the roof rack at high speeds or during sudden stops. Bow and stern lines stabilize the boat and reduce the risk of accidents on the road.
How do you lock a kayak to a roof rack?
Use a cable lock or a kayak-specific locking strap to lock a kayak to a roof rack. Thread the cable or strap through the kayak's security loop (if available) or a sturdy part of its frame and then around the roof rack's bars, securing it with a lock.
